
For 2025, I decided to share more content on my personal blog. To make life a little easier for myself, I decided to move away from Hugo as a static site generator again. It was not that I was unhappy with Hugo itself. It was more that I wanted a slightly shorter path to publishing again. Before Hugo, I used a homegrown solution and then WordPress.
I have now used Statamic as the foundation, and I would like to tell you a little about it here.
Why did I choose Statamic?
One reason was that I was planning to explore Statamic anyway. It is an interesting and affordable alternative to headless content management systems. A headless CMS was not really my focus. The site published here is also a monolith. So headless was not the reason. However, I might need headless functionality at some point. Statamic offers a GraphQL and a REST interface for this (in the paid version).
Unfortunately, the official interfaces are "read only". But I specifically want to use other tools to automatically create draft articles on my website via an API. So I had to look for another solution within Statamic.
Statamic itself is based on the Laravel framework. Laravel has now become the undisputed most popular framework in the PHP world. So it is no surprise that ready-made solutions already exist here. In my case, I found what I needed in the Private REST API Addon. The addon provides private routes with CRUD operations that can be used to maintain the individual components of Statamic (collections, taxonomies, navigation, ...). That is a great thing.
Statamic is "Flat First"
Statamic itself aims to compete with WordPress. So it is no surprise that there is now also a way to import WordPress (Gutenberg) content directly into Statamic. However, I already had Markdown content with a little special syntax for Hugo.
Statamic has excellent Markdown support. That meant the content could be transferred very quickly.
Statamic uses simple files for data storage. There is no traditional MySQL database in the standard installation. This also makes hosting very easy. At first, that sounds as though it might be slow. But it is not at all. Statamic comes with a sophisticated system called the Stache. Since data also needs to be filtered, Stache supports indexes for individual fields too.
Unlike WordPress, Statamic does not come with a predefined concept of how blog posts and pages should be structured. So you first have to define your own data structure.
You define your data using blueprints and can choose from 40 different field types, which can also be reused through fieldsets, to build your collections (lists of entries).
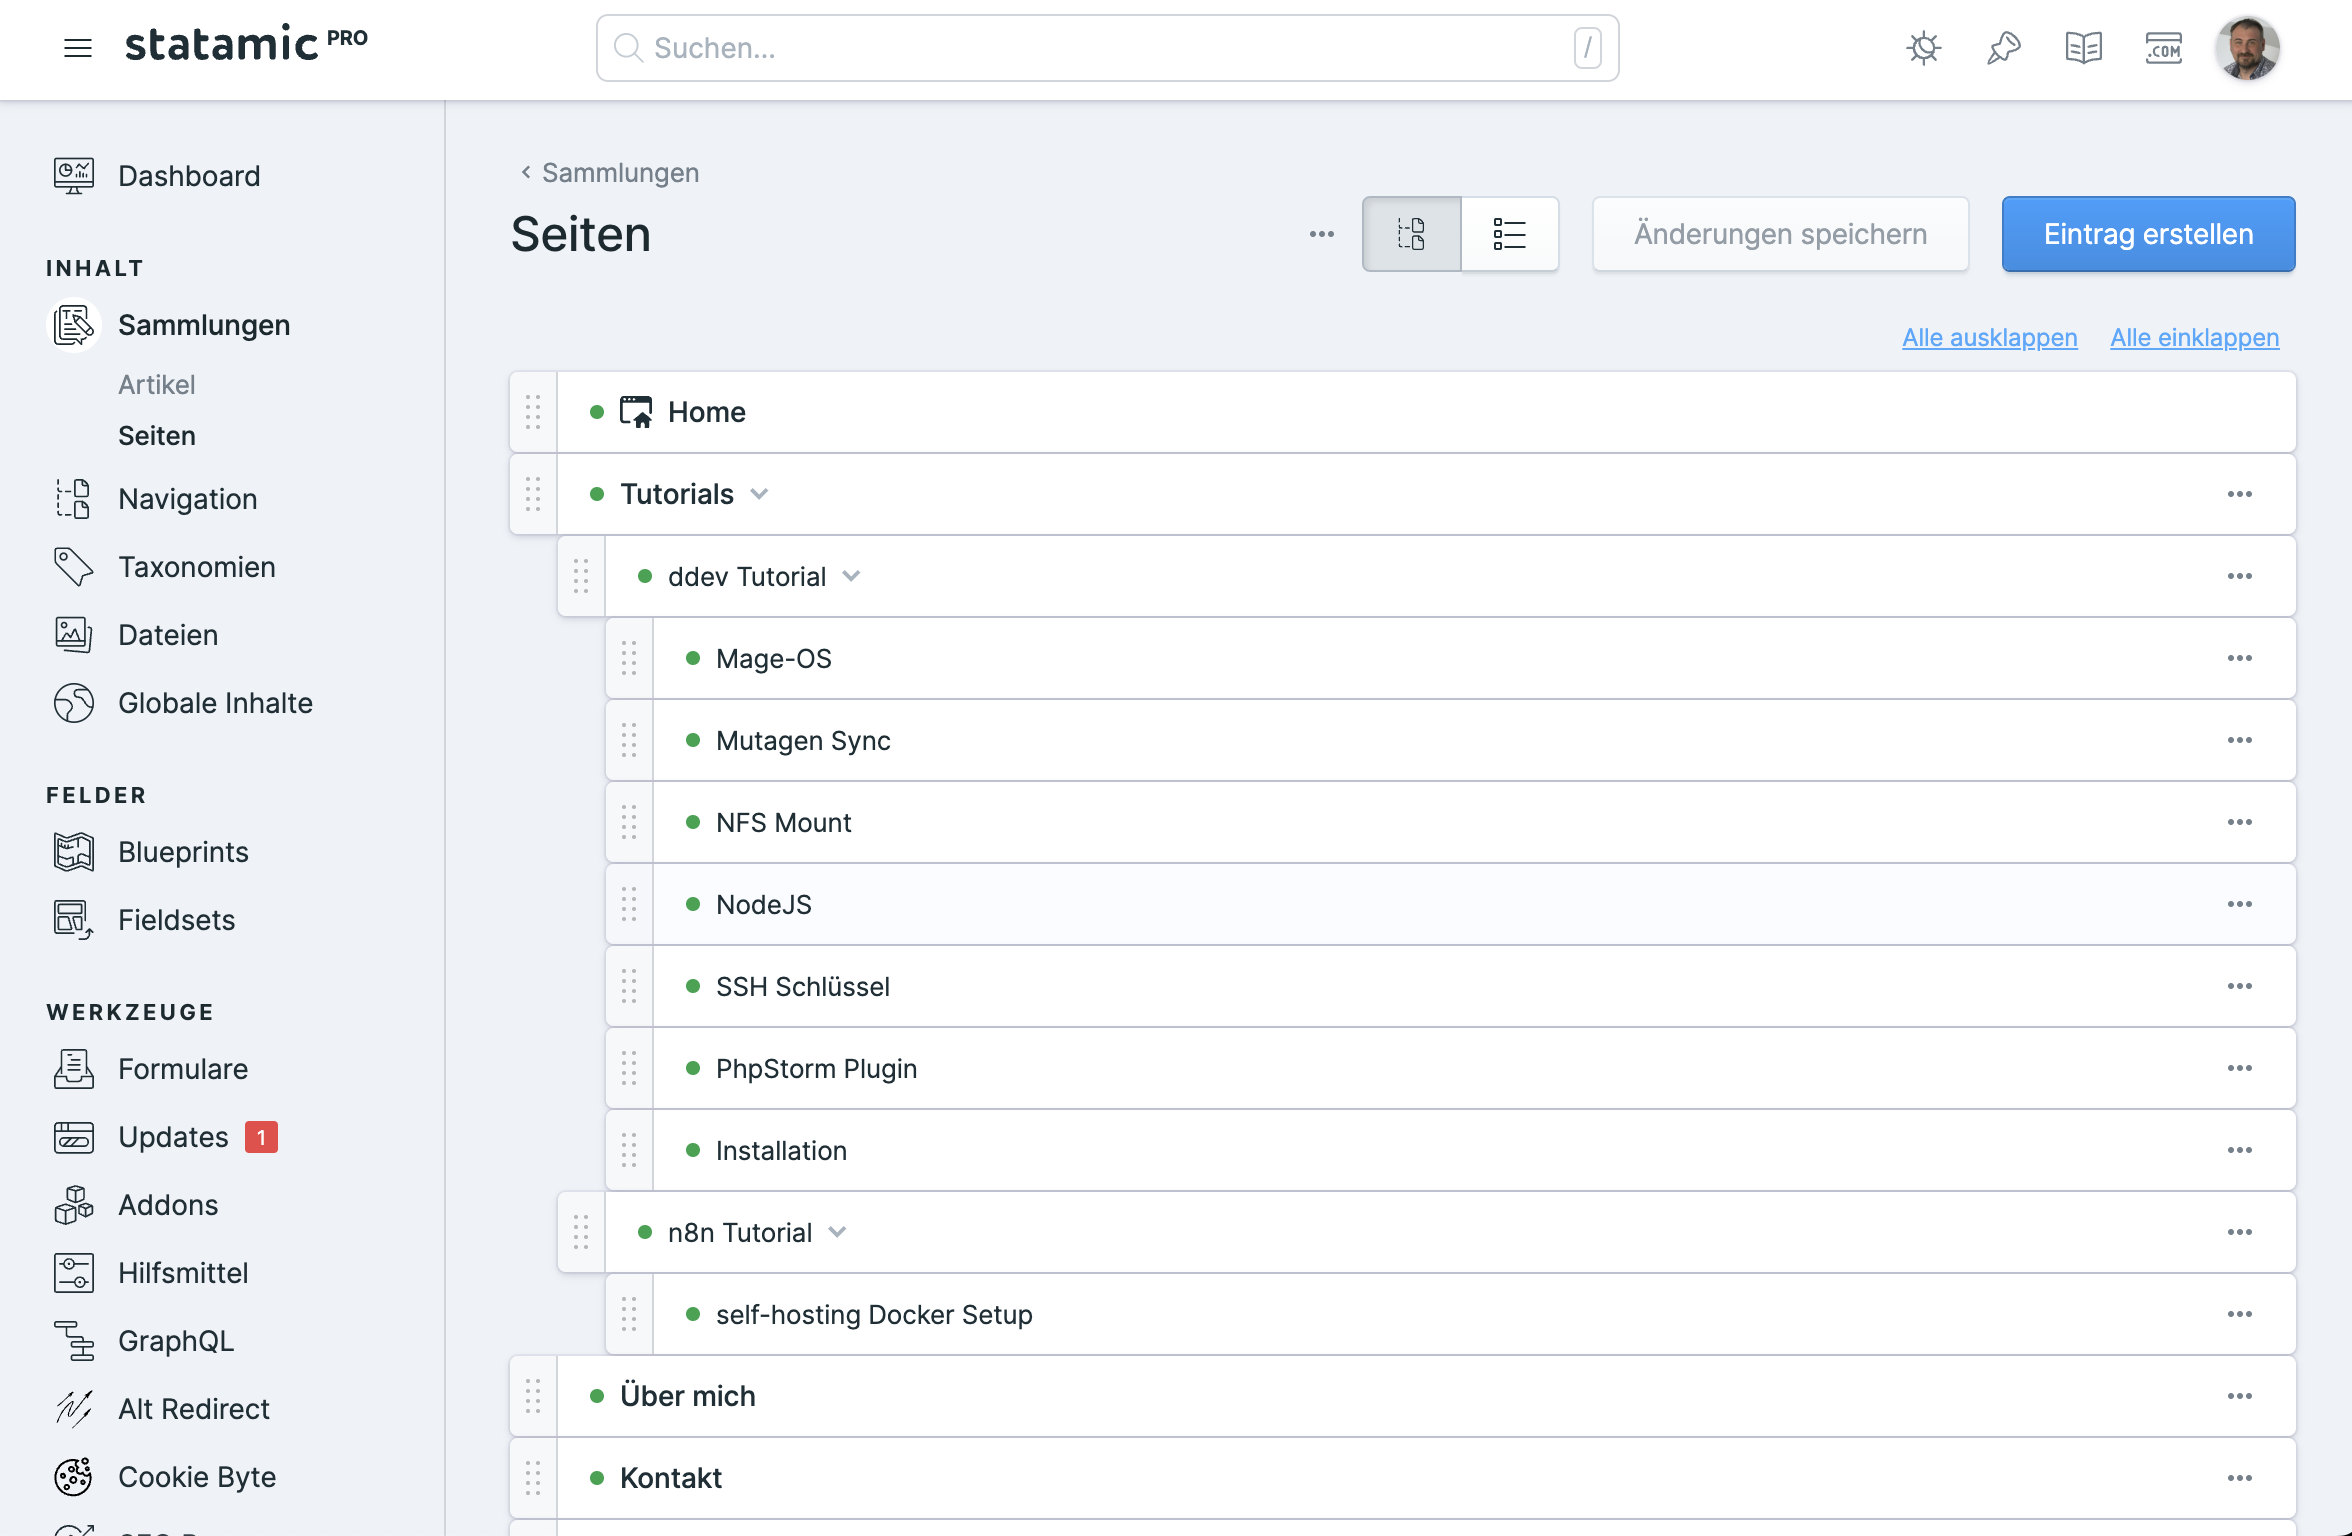
One interesting field type is Bard. This type lets you create a page builder element whose content elements you can define entirely yourself. Bard is then a block editor that is very easy to configure. It is intended to compete with WordPress Gutenberg. In my view, though, creating an element for Bard takes considerably less effort. That is what I will tackle next. As a first step, I simply copied my Markdown content. Copied in the literal sense. I just copied the .md files from Hugo into the "content" directory of the collection I had created and used search and replace to replace attributes in the YAML front matter. That was it. After that, all my blog posts had been migrated.
I then replaced the special Hugo syntax manually.
AI cannot be left out
Because AI is in everything these days...
So far, I have made little use of AI on the blog. One thing that is not much fun is maintaining ALT attributes.
For this, I installed the small AI Alt Text addon, which delegates this task to the OpenAI API.
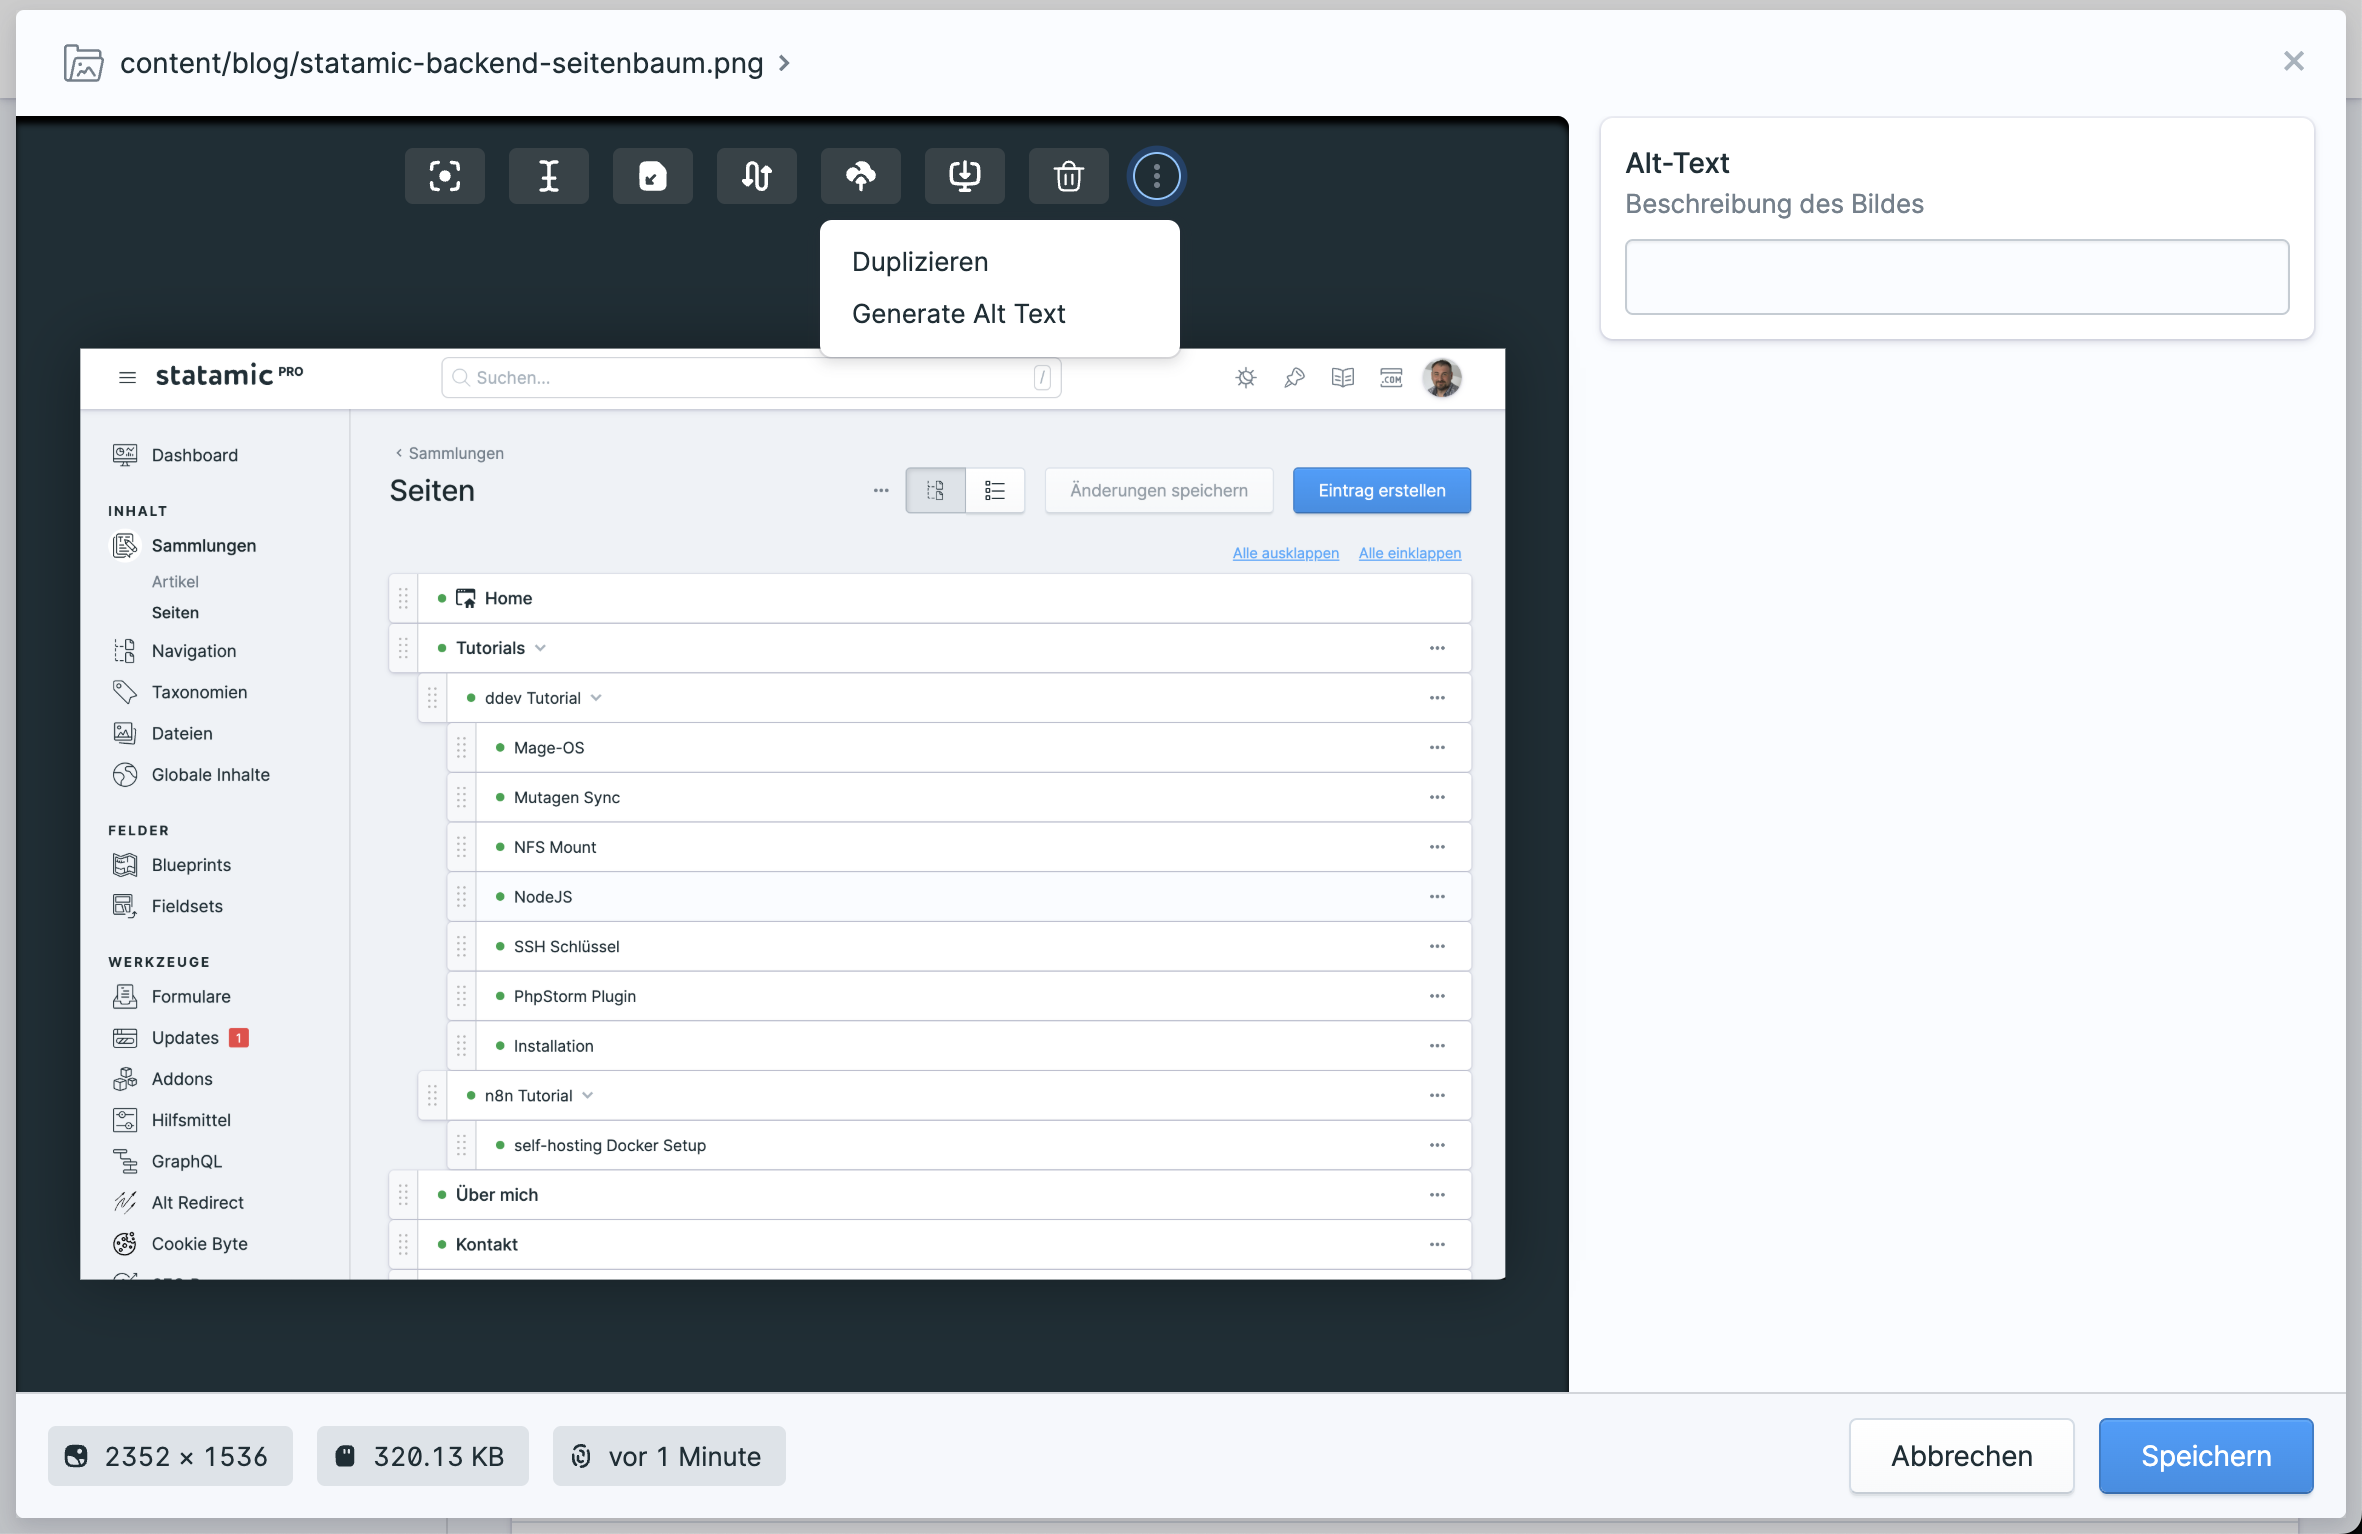
But the "AI addon list" will certainly grow over time (see the addon marketplace: AI category).
Technical implementation details
Laravel guard for API authentication
Unfortunately, authentication for the private API is not handled, and you have to take care of securing it yourself. I therefore decided to develop my own guard for Laravel. The guard reads an API token attribute that can be maintained for a user in my setup. The API token can then be sent as a bearer token for authentication. Problem solved.
If anyone else needs a guard like this... Here is the code:
<?php
declare(strict_types=1);

namespace App\Guards;

use Illuminate\Auth\TokenGuard;
use Illuminate\Support\Facades\Cache;
use Illuminate\Support\Facades\Hash;
use Statamic\Auth\UserProvider;
use Statamic\Facades\User;

class SimpleBearerTokenGuard extends TokenGuard
{
    const USER_ALL_CACHE_TTL = 60;
    protected $request;

    /**
     * @var UserProvider
     */
    protected $provider;

    protected $user;

    public function check()
    {
        return $this->user() !== null;
    }

    public function guest()
    {
        return !$this->check();
    }

    public function user()
    {
        if ($this->user) {
            return $this->user;
        }

        $token = $this->request->header('Authorization');
        if ($token && str_starts_with($token, 'Bearer ')) {
            $token = substr($token, 7); // Remove "Bearer " prefix

            $this->user = $this->findUserByAuthToken($token);
        }

        return $this->user;
    }

    public function validate(array $credentials = [])
    {
        // Validation logic can be added here if needed
        return false;
    }

    private function findUserByAuthToken($token) {
        // Cache users for a day to avoid loading files repeatedly.
        $users = Cache::remember('statamic_users', self::USER_ALL_CACHE_TTL, function () {
            return User::all();
        });

        foreach ($users as $user) {
            $hashedToken = $user->get('api_auth_token');

            if ($hashedToken && Hash::check($token, $hashedToken)) {
                return $user; // Return the matched user
            }
        }

        return null;
    }
}
I created the user's API token text field through the Statamic backend and selected the "Password" option so that it is not displayed directly. However, Statamic does not hash the password automatically. So I created a listener that listens for the UserSaving event.
<?php

namespace App\Listeners;

use Illuminate\Support\Facades\Hash;
use Statamic\Events\UserSaving;

class HashAuthToken
{
    protected static $processing = false;

    /**
     * Handle the event.
     */
    public function handle(UserSaving $event): void
    {
        $user = $event->user;

        if ($user->api_auth_token && Hash::needsRehash($user->api_auth_token)) {
            $user->set('api_auth_token', Hash::make($user->api_auth_token));
        }
    }
}
This is then wired up through an EventServiceProvider.
<?php
declare(strict_types=1);

namespace App\Providers;

use App\Listeners\HashAuthToken;
use Illuminate\Support\ServiceProvider;
use Statamic\Events\UserSaving;

class EventServiceProvider extends ServiceProvider
{
    protected $listen = [
        UserSaving::class => [
            HashAuthToken::class,
        ],
    ];
}
Markdown rendering
My blog posts (including this one) contain lots of code blocks. I want syntax highlighting to make the code easier for readers to understand.
To get syntax highlighting in Statamic Markdown code blocks, the rendering needs to be adjusted. One solution is to register a Markdown extension in the application's \App\Providers\AppServiceProvider.
use use App\Markdown\SyntaxHighlightExtension;

// ...

public function boot(UrlGenerator $url): void
{
    Markdown::addExtension(function() {
        return [
            new SyntaxHighlightExtension(),
        ];
    });
}
Statamic uses the League\CommonMark library to render Markdown, which allows you to intervene in the rendering process. Here, you can register your own extension that passes code blocks (FencedCode) and indented code (IndentedCode) to a highlighter.
For the highlighting itself, I installed Spatie\CommonMarkHighlighter. Installation is straightforward using Composer.
<?php

declare(strict_types=1);

namespace App\Markdown;

use League\CommonMark\Environment\EnvironmentBuilderInterface;
use League\CommonMark\Extension\CommonMark\Node\Block\FencedCode;
use League\CommonMark\Extension\CommonMark\Node\Block\IndentedCode;
use League\CommonMark\Extension\ExtensionInterface;
use Spatie\CommonMarkHighlighter\FencedCodeRenderer;
use Spatie\CommonMarkHighlighter\IndentedCodeRenderer;

class SyntaxHighlightExtension implements ExtensionInterface
{

    public function register(EnvironmentBuilderInterface $environment): void
    {
        $environment->addRenderer(FencedCode::class, new FencedCodeRenderer(), 1000);
        $environment->addRenderer(IndentedCode::class, new IndentedCodeRenderer(), 1000);
    }
}
Privacy-compliant display of external content
Occasionally, I use external tools to embed content. This usually means content such as social media posts (X, Bluesky, Mastodon), a video from Vimeo or YouTube, or slides from Slideshare or Speaker Deck. I have also occasionally embedded terminal demos using asciinema.
The content is usually embedded using an iframe tag. That is easy, but you quickly lose control over the content, and one integration or another might use a cookie, for example.
I decided to let users choose for every piece of external content that is to be displayed. The paid addon Cookie Byte offers a solution for this.
It allows you to maintain content covers, which you can then wrap around the embed in your template.
First, though, you need to handle embedding content in Statamic. For this, I added another Markdown extension through App\Providers\AppServiceProvider.
use League\CommonMark\Extension\Embed\EmbedExtension;

// ...

public function boot(UrlGenerator $url): void
{
    Markdown::addExtension(function() {
        return [
            new SyntaxHighlightExtension(),
            new EmbedExtension(), // <-- Dient der Einbettung von Inhalten
        ];
    });
}
By default, the extension uses the Composer package embed/embed. The package is very popular. However, the developer no longer wants to maintain the package in the long term. EmbedExtension lets you swap out the adapter that handles embedding (through the configuration in config/statamic/markdown.php). You only need to implement a simple interface.
I decided to develop my own adapter here, which then uses the Embera\Embera package. Embera includes more than 150 embedding providers, but you do not need all of them. You can register only the providers you need. This speeds up page rendering.
In my EmberaEmbedAdapter, I then inserted the content covers using an Antlers tag (Statamic's template engine) provided by the cookie addon.
Excerpt from the adapter code:
// ...

$embeds[$i]->setEmbedCode(
    (string) Antlers::parse(
    ''
    )
);
Explaining the full implementation of my
EmberaEmbedAdapterwould go beyond the scope of this blog post. So that is all for now.
The cookie plugin then displays an appropriate consent banner when the user visits the website. If third-party cookies are not allowed, the cookie_cover tag displays a container with a background image, text, and a button for enabling cookies afterward instead of the iframe or the embed's JavaScript. When the button is pressed, the page is loaded with the embedded content.
I have done without other external content such as fonts.
Frontend UI with Tailwind CSS, Alpine.js, and Maria
Since I am no expert in frontend styling, but the site should still be optimized for mobile use, I asked my colleague Maria Kern for a few tips.
For the frontend, I use Tailwind CSS and a little Alpine.js. Some readers from the Magento world will already know these from the well-known Hyvä.
Thanks to Tailwind UI and Maria, I was able to make the frontend reasonably attractive and, above all, as accessible as possible for readers.
Statamic integrates JS and CSS using Vite, following the standard for Laravel applications.
For users who do not want to do everything themselves, there is something similar to a theme. In Statamic, this is called a starter kit. Starter kits generally provide blueprints for collections along with the matching templates and configurations. So the concept goes a little further than what you are used to from WordPress.
I did without a starter kit for my blog because I wanted to get to know everything from the ground up.
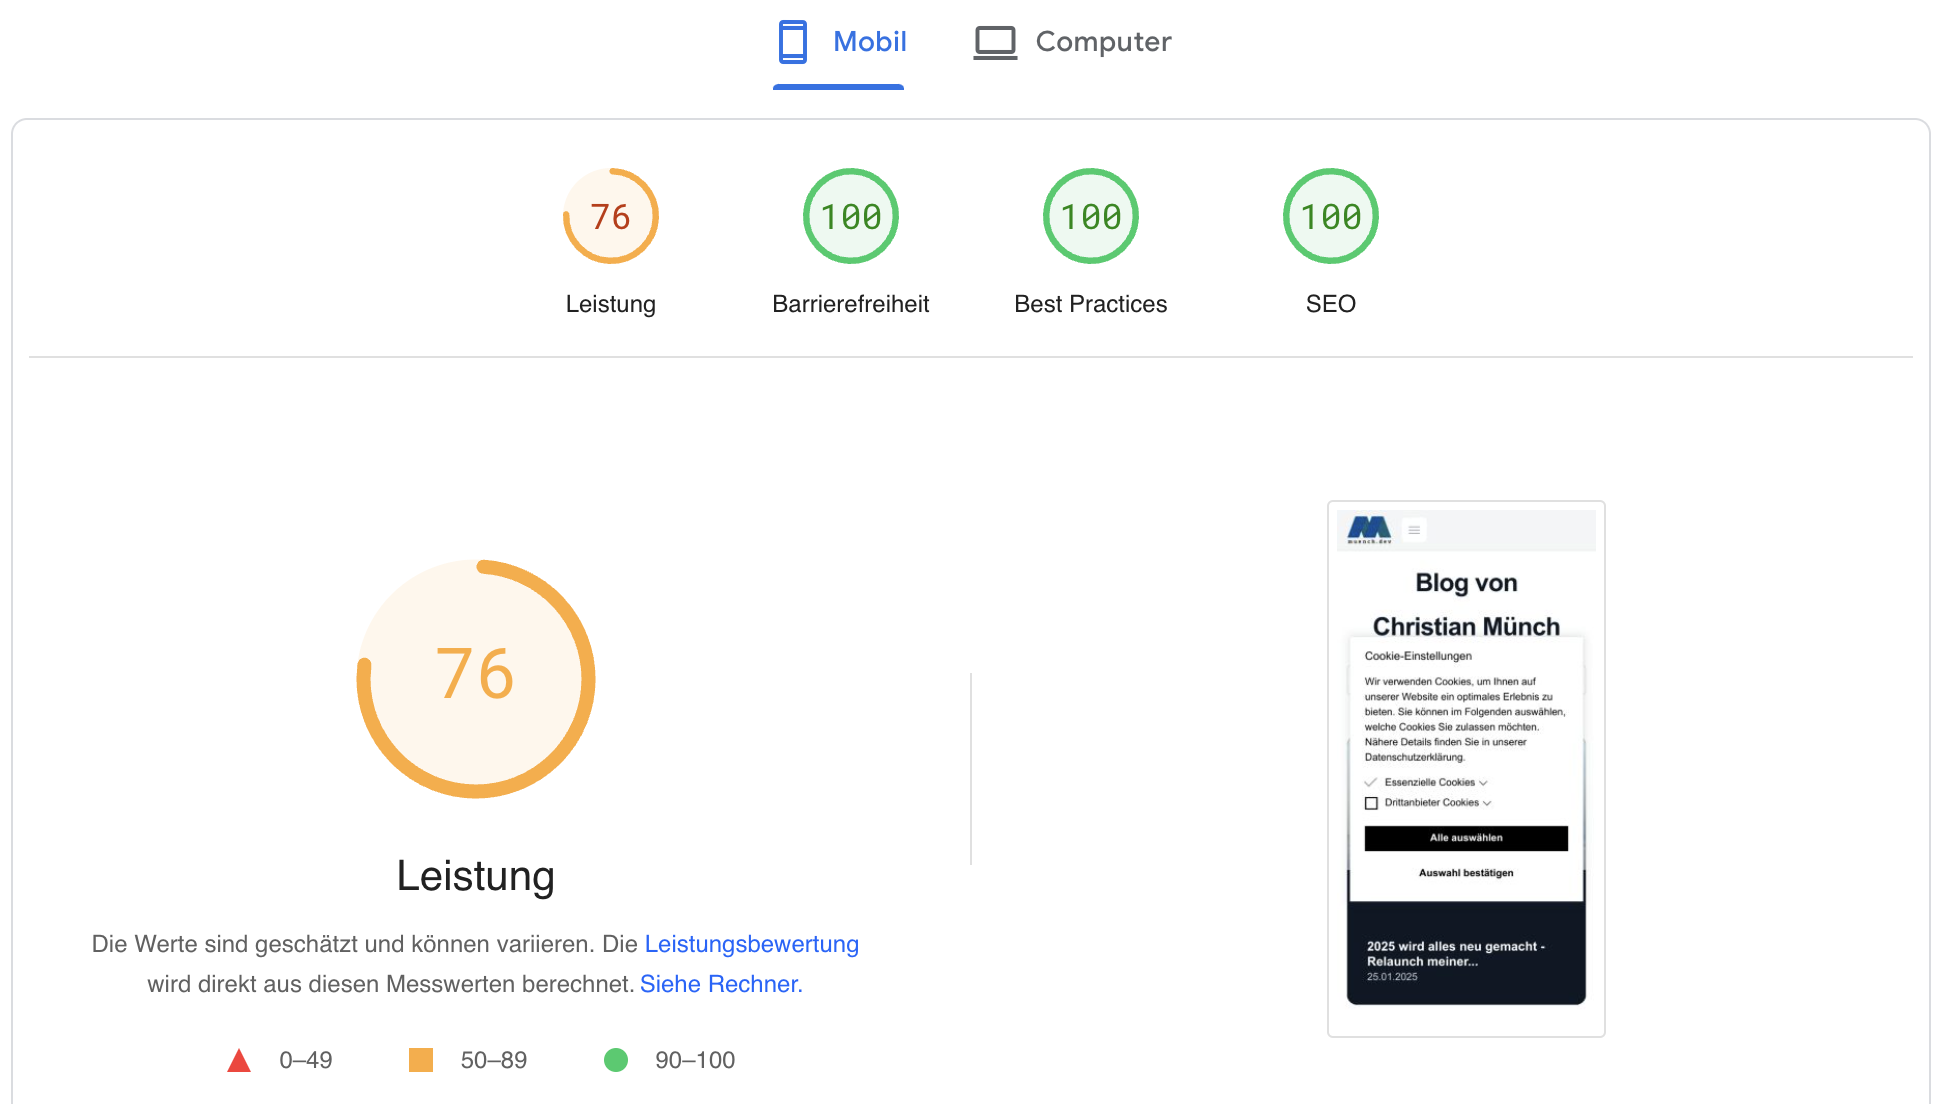
Not everything is optimal yet. In particular, I definitely still need to optimize the images, which are still much too large, as the PageSpeed test shows.
Developer setup with ddev
For the developer setup, I use ddev. Since ddev now directly supports Laravel setups with its own project type, this is not rocket science and can be set up in no time.
Matthias Andrach, who is well known in the ddev world, explained a setup like this very clearly in a blog post.
Matthias also developed a nice ddev addon for please (Statamic's CLI tool), which I installed in my setup.
Since no database is needed locally, I disabled creation of the DB container using ddev config --omit-containers=db.
I use IntelliJ Ultimate as my development environment. There, I installed the Antlers Language Support plugin.
Running Statamic in Docker
Since I have been using Docker and Traefik (as a reverse proxy) on my Hetzner server for a long time, I simply created a project based on Docker Compose here.
Here is my configuration with nothing censored :-)
Since there is no database, there is nothing I need to censor either.
services:
  statamic:
    image: shinsenter/statamic
    container_name: statamic
    restart: always
    volumes:
      - ./statamic:/var/www/html
    labels:
      - "traefik.enable=true"
      - "traefik.http.routers.muench_dev_unsecure.rule=Host(`muench.dev`) || Host(`www.muench.dev`)"
      - "traefik.http.routers.muench_dev_unsecure.entrypoints=http"
      - "traefik.http.routers.muench_dev_unsecure.middlewares=redirect-to-https,redirect-to-non-www,secure-headers@file"
      - "traefik.http.routers.muench_dev_secure.tls=true"
      - "traefik.http.routers.muench_dev_secure.rule=Host(`muench.dev`) || Host(`www.muench.dev`)"
      - "traefik.http.routers.muench_dev_secure.tls.certresolver=letsencrypt"
      - "traefik.http.routers.muench_dev_secure.entrypoints=https"
      - "traefik.http.routers.muench_dev_secure.middlewares=redirect-to-non-www,secure-headers@file"
      - "traefik.http.services.muench_dev.loadbalancer.server.port=80"
      - "traefik.http.middlewares.redirect-to-https.redirectscheme.scheme=https"
      - "traefik.http.middlewares.redirect-to-https.redirectscheme.permanent=true"
      - "traefik.http.middlewares.redirect-to-non-www.redirectregex.regex=^https?://www.muench.dev/(.*)"
      - "traefik.http.middlewares.redirect-to-non-www.redirectregex.replacement=https://muench.dev/$${1}"
      - "traefik.http.middlewares.redirect-to-non-www.redirectregex.permanent=true"
    environment:
      - HTTPS=on
      - ENABLE_CRONTAB=1
      - CRONTAB_SETTINGS=* * * * *    php artisan schedule:run >> /dev/null 2>&1
    depends_on:
      - redis
    networks:
      - web

  redis:
    container_name: statamic_redis
    image: redis:7-alpine
    restart: unless-stopped
    networks:
      - web
    volumes:
      - redis-data:/data
    healthcheck:
      test: ['CMD', 'redis-cli', 'ping']
      interval: 5s
      timeout: 5s
      retries: 10

volumes:
  redis-data:

networks:
  web:
    external: true
Traefik reads the labels. The Traefik server is configured with middleware that can redirect HTTP to HTTPS.
The Traefik server also sets a few security headers for the browser. In addition, the reverse proxy takes care of renewing Let's Encrypt certificates.
Redis is optional in Statamic. I switched caching from files to Redis.
If I eventually have too much data and the Statamic Stache becomes too slow (> 30,000 blog posts), it can also be moved to a database. Statamic offers quite a few options here.
Laravel lets you manage jobs through a queue. This can also be stored in Redis.
To run Statamic, I used the ready-made Docker image shinsenter/statamic, which is optimized for production use. You just need to make sure you correctly enable and register the crontab and cron jobs (see the ENV variables).
What comes next?
A simple idea turned into a lot of work. Over the last few weeks, I spent quite a few nights porting and optimizing my website.
The content itself was not what consumed the time. It was trying out concepts. Learning a new template syntax. SEO optimization. Coding missing features.
Implementing the frontend with my outdated understanding of CSS.
Deploying to the target system. And so on and so on...
I hope you will also enjoy it in the future when I share more details of my personal system landscape.
Update 26.01.2025
The cover images have now been switched to responsive images, and they are also delivered in webp format.
The PageSpeed score has now jumped considerably.
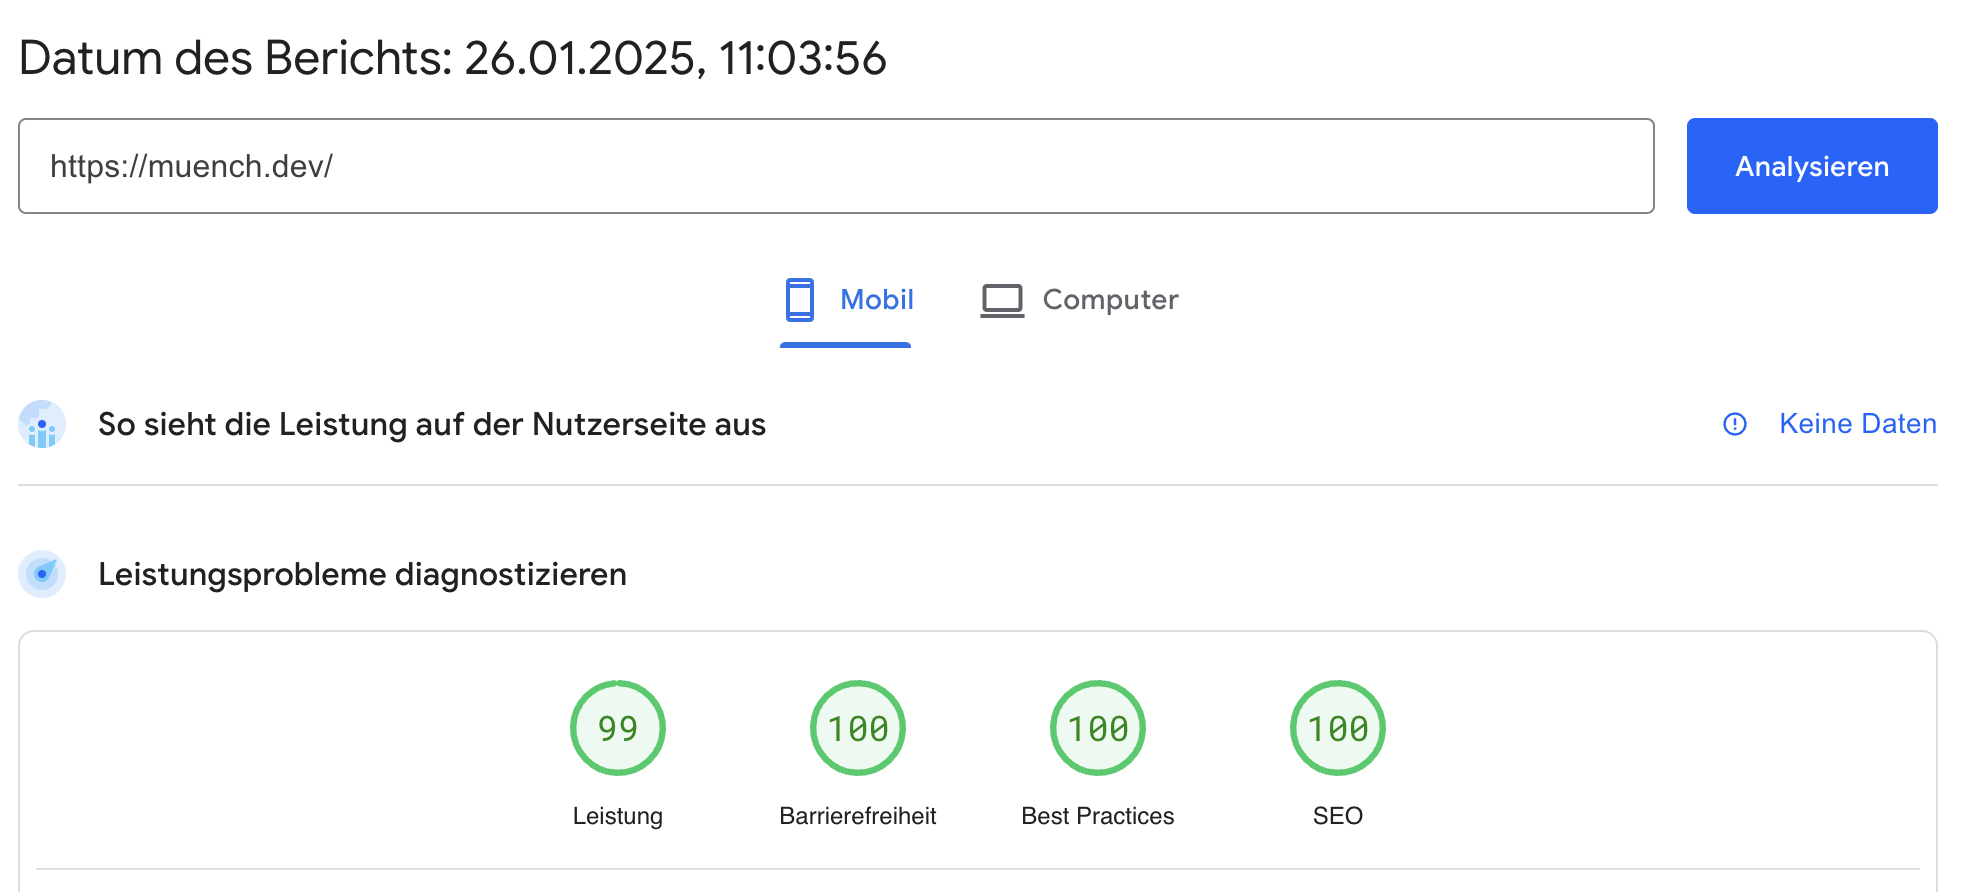
This was quite easy in Statamic using the Responsive Images addon.
To convert the content (after switching to the Responsive Image Field), I ran the following command.
Link to the GitHub Gist: https://gist.github.com/cmuench/31dd3b15ff2b9ac15c3a16012b09e2ab
Update 02.02.2025
I have now enabled a "Table of Contents" feature for blog posts, which I can activate manually for each page. Not every article is long enough to need it. You can see it right at the top of this blog post.
Breadcrumb navigation is also active. This is particularly important on the tutorial pages.